Monday, November 10, 2014

umask setting using sshd_config on Solaris 10 for scp,sftp file transfers

I was looking to setup a custom umask for specific user using sftp and scp connection types.

1. sftp
2. scp
3. ssh hostname
4. ssh hostname program

The difference between 3. and 4. is that the former starts a shell which usually reads the/etc/profile information while the latter doesn't.

In addition by reading this post I've became aware of the -u option that is present in newer versions of
OpenSSH.

However this doesn't work.
I must also add that /etc/profile now includes umask 0027.

Going point by point:
sftp - Setting -u 0027 in sshd_config as mentioned here, is not enough


It's quite easy to force environments variables in an SSH session, since /etc/profile, /etc/bash.bashrc etc. are read. But when you launch commands with SSH without opening a session, these files are not parsed, so it gets harder to set the environment.


So it can be useful to know that /etc/environment is read by SSH as well as login.
The format is "VARIABLE=VALUE" for each line.

In my case, I needed to force TMPDIR to "/var/lib/gforge-dop/chroot/tmp" so I just put "TMPDIR=/var/lib/gforge-dop/chroot/tmp" in /etc/environment and it worked :)

The umask is not an environment variable; it is a property of the process and has to be set by a system call.

---------------------------------------------------------------------------------------------------------
Solaris 11
http://docs.oracle.com/cd/E26502_01/html/E29042/ssh-config-4.html#REFMAN4ssh-config-4

Solaris 10
http://docs.oracle.com/cd/E26505_01/html/816-5174/sshd-config-4.html#REFMAN4sshd-config-4
---------------------------------------------------------------------------------------------------------

Hello Pankaj,

As per our conversation, it is not possible to set umask per user in S10 with sftp .
This feature is only available in S11.

Here is the RFE/bug filed:
6803109: Add option for sftp/scp server to set a default umask

It was addressed in S11 and not in S10.

Customer transfers files and changes umask on sftp server is the workaround or upgrade system to S11.

Regards,

Oracle

Solaris and Network Domain, Global Systems Support
Phone: +1 800-223-1711
Oracle Global Customer Services

Experience with Redhat Storage (RHS 2.1.1)

docs
https://access.redhat.com/site/documentation/en-US/Red_Hat_Storage/

Installation

mount -o loop /home/pkg/RHSS-2.1-20131122.0-RHS-x86_64-DVD1.iso /mnt/RHS

Redhat storage version:

redhat-storage-server-2.1.1.0-6.el6rhs.noarch

Nodes:
11.16.153.226 pgvr1126 RHS POC PG 1/23/2014

11.16.153.227 pgvr1127 RHS POC PG 1/23/2014

11.16.153.228 pgvr1128 RHS POC PG 1/23/2014

11.16.153.229 pgvr1129 RHS POC PG 1/23/2014

XFS - Format the back-end file system using XFS for glusterFS bricks. XFS can journal

metadata, resulting in faster crash recovery.

The XFS file system can also be defragmented and expanded while mounted and active.

3 different installing RHS: ISO, PXE server, Red Hat Satellite Server

Created a VM under RHS POC with 8GB/16G RAM

booted with RHS iso RHSS-2.1-20131122.0-RHS-x86_64-DVD1.iso

---Install and upgrade doesn't work because of drivers issues

---Install with basic driver (second option)

Starting and Stopping the glusterd service

# service glusterd start/stop

Node 1

[root@pgvr1126 ~]# cat /etc/redhat-release

Red Hat Enterprise Linux Server release 6.4 (Santiago)

[root@pgvr1126 ~]# pvcreate /dev/sdb

Physical volume "/dev/sdb" successfully created

[root@pgvr1126 ~]# vgcreate rhsvg01 /dev/sdb
Volume group "rhsvg01" successfully created

[root@pgvr1126 ~]# lvcreate -n rhslv01 -L 9G rhsvg01

Logical volume "rhslv01" created

[root@pgvr1126 ~]# mkfs.xfs -i size=512 /dev/mapper/rhsvg01-rhslv01

meta-data=/dev/mapper/rhsvg01-rhslv01 isize=512    agcount=4, agsize=589824 blks

=                       sectsz=512   attr=2, projid32bit=0 data   =  bsize=4096   blocks=2359296, imaxpct=25

=                       sunit=0      swidth=0 blks naming   =version 2   bsize=4096   ascii-ci=0

log      =internal log           bsize=4096   blocks=2560, version=2   =   sectsz=512   sunit=0 blks, lazy-count=1 realtime =none                   extsz=4096   blocks=0, rtextents=0

[root@pgvr1126 ~]# pvs

 PV         VG            Fmt  Attr PSize  PFree

  /dev/sda2  vg_pgvr1126 lvm2 a--  15.51g       0

  /dev/sdb   rhsvg01       lvm2 a--  10.00g 1020.00m

[root@pgvr1126 ~]# mkdir -p /gluster/xfs

[root@pgvr1126 ~]# vi /etc/fstab

/dev/mapper/rhsvg01-rhslv01  /gluster/xfs    xfs    defaults,inode64,noatime   0 0

[root@pgvr1126 ~]# mount -a

[root@pgvr1126 ~]# df -h

Filesystem            Size  Used Avail Use% Mounted on

/dev/mapper/vg_pgvr1126-lv_root

                      7.6G  1.8G  5.5G  25% /

tmpfs                 4.0G     0  4.0G   0% /dev/shm

/dev/sda1             485M   33M  427M   8% /boot

/dev/mapper/rhsvg01-rhslv01

                      9.0G   33M  9.0G   1% /gluster/xfs
[root@pgvr1126 ~]# vi /etc/hosts

11.16.153.226    pgvr1126

11.16.153.227    pgvr1127

11.16.153.228    pgvr1128

11.16.153.229    pgvr1129

Gluster FS commands:

[root@pgvr1126 ~]# gluster peer probe pgvr1127

peer probe: success.

[root@pgvr1126 ~]# gluster peer status

Number of Peers: 1

Hostname: pgvr1127

Uuid: f216c593-e358-4842-8c8e-c51e3152af63

State: Peer in Cluster (Connected)

[root@pgvr1126 ~]# gluster volume create rhs01 replica 2 pgvr1126:/gluster/xfs/rhs01 md

volume create: rhs01: success: please start the volume to access data

[root@pgvr1126 ~]# gluster volume start rhs01

volume start: rhs01: success

[root@pgvr1126 ~]# df -h

Filesystem            Size  Used Avail Use% Mounted on

/dev/mapper/vg_pgvr1126-lv_root

                      7.6G  1.8G  5.5G  25% /

tmpfs                 4.0G     0  4.0G   0% /dev/shm

/dev/sda1             485M   33M  427M   8% /boot

/dev/mapper/rhsvg01-rhslv01

                      9.0G   33M  9.0G   1% /gluster/xfs

[root@pgvr1126 ~]# gluster volume info

Volume Name: rhs01

Type: Replicate

Volume ID: 13a73b40-dfce-4b79-b047-c7bffaa2a879

Status: Started

Number of Bricks: 1 x 2 = 2

Transport-type: tcp

Bricks:

Brick1: pgvr1126:/gluster/xfs/rhs01

Brick2: pgvr1127:/gluster/xfs/rhs01

[root@pgvr1126 ~]# cd /gluster/xfs/rhs01

[root@pgvr1126 rhs01]# ls -l

total 0

drwxr-xr-x 2 root root 6 Feb 11 17:11 pankaj

Node 2

[root@pgvr1127 ~]# pvcreate /dev/sdb

  Physical volume "/dev/sdb" successfully created

[root@pgvr1127 ~]#  vgcreate rhsvg01 /dev/sdb

  Volume group "rhsvg01" successfully created

[root@pgvr1127 ~]# lvcreate -n rhslv01 -L 9G rhsvg01

  Logical volume "rhslv01" created

[root@pgvr1127 ~]#  mkdir -p /gluster/xfs

[root@pgvr1127 ~]#  mkfs.xfs -i size=512 /dev/mapper/rhsvg01-rhslv01

meta-data=/dev/mapper/rhsvg01-rhslv01 isize=512    agcount=4, agsize=589824 blks

         =                       sectsz=512   attr=2, projid32bit=0

data     =                       bsize=4096   blocks=2359296, imaxpct=25

         =                       sunit=0      swidth=0 blks

naming   =version 2              bsize=4096   ascii-ci=0

log      =internal log           bsize=4096   blocks=2560, version=2

         =                       sectsz=512   sunit=0 blks, lazy-count=1

realtime =none                   extsz=4096   blocks=0, rtextents=0

[root@pgvr1127 ~]# vi /etc/fstab

[root@pgvr1127 ~]# mount -a

[root@pgvr1127 ~]# df -h

Filesystem            Size  Used Avail Use% Mounted on

/dev/mapper/vg_pgvr1127-lv_root

                       12G  1.8G  9.1G  17% /

tmpfs                1004M     0 1004M   0% /dev/shm

/dev/sda1             485M   33M  427M   8% /boot

/dev/mapper/rhsvg01-rhslv01

                      9.0G   33M  9.0G   1% /gluster/xfs

[root@pgvr1127 ~]# vi /etc/hosts

[root@pgvr1127 ~]# gluster peer probe pgvr1126

peer probe: success.

[root@pgvr1127 ~]# gluster peer status

Number of Peers: 1

Hostname: pgvr1126

Uuid: 29a69702-0ffd-42f7-9105-474098d7be30

State: Peer in Cluster (Connected)

[root@pgvr1127 ~]# df -h

Filesystem            Size  Used Avail Use% Mounted on

/dev/mapper/vg_pgvr1127-lv_root

                       12G  1.8G  9.1G  17% /

tmpfs                1004M     0 1004M   0% /dev/shm

/dev/sda1             485M   33M  427M   8% /boot

/dev/mapper/rhsvg01-rhslv01

                      9.0G   33M  9.0G   1% /gluster/xfs

File system block size 1024 limitations

User was trying to copy a 36GB file and terminates after about 17GB. She tried couple of times and it terminates. We reproduced the issue and confirmed that the file size doesn't increase after about 17GB however the scp from the remote host keep writing to the disk.

[root@mdc2vr6009 data]# blockdev --getbsz /dev/VolGroup01/LogVol11
4096

Please confirm the block size
[root@mdc2vr6009 data]# blockdev --getbsz /dev/VolGroup02/data
1024

The default block size is 4096 bytes
 blockdev --report
dumpe2fs /dev/sdb3 | grep -i 'Block size'

https://ext4.wiki.kernel.org/index.php/Ext4_Disk_Layout#Blocks
By default a filesystem can contain 2^32 blocks; if the '64bit' feature is enabled, then a filesystem can have 2^64 blocks.
File System Maximums
32-bit mode64-bit mode
Item1KiB2KiB4KiB64KiB1KiB2KiB4KiB64KiB
Blocks2^322^322^322^322^642^642^642^64
Inodes2^322^322^322^322^322^322^322^32
File System Size4TiB8TiB16TiB256PiB16ZiB32ZiB64ZiB1YiB
Blocks Per Block Group8,19216,38432,768524,2888,19216,38432,768524,288
Inodes Per Block Group8,19216,38432,768524,2888,19216,38432,768524,288
Block Group Size8MiB32MiB128MiB32GiB8MiB32MiB128MiB32GiB
Blocks Per File, Extents2^322^322^322^322^322^322^322^32
Blocks Per File, Block Maps16,843,020134,480,3961,074,791,4364,398,314,962,95616,843,020134,480,3961,074,791,4364,398,314,962,956
File Size, Extents4TiB8TiB16TiB256TiB4TiB8TiB16TiB256TiB
File Size, Block Maps16GiB256GiB4TiB256PiB16GiB256GiB4TiB256PiB
Note: Files not using extents (i.e. files using block maps) must be placed in the first 2^32 blocks of a filesystem.


[root@mdc1brc0107 ~]# blockdev --getbsz /dev/mapper/VolGroup01-backup_lv
4096


[root@mdc2vr6009 /]# lvcreate -n data --size 290G VolGroup02
Logical volume "data" created
[root@mdc2vr6009 /]# lvs
LV VG Attr LSize Origin Snap% Move Log Copy% Convert
LogVol10 VolGroup01 -wi-ao 4.00g
LogVol11 VolGroup01 -wi-ao 6.00g
LogVol12 VolGroup01 -wi-ao 30.00g
LogVol13 VolGroup01 -wi-ao 6.00g
LogVol14 VolGroup01 -wi-ao 6.00g
LogVol15 VolGroup01 -wi-ao 30.00g
swap VolGroup01 -wi-ao 12.00g
data VolGroup02 -wi-a- 290.00g

[root@mdc2vr6009 /]# mkfs
mkfs mkfs.ext2 mkfs.ext4 mkfs.msdos
mkfs.cramfs mkfs.ext3 mkfs.ext4dev mkfs.vfat
[root@mdc2vr6009 /]# mkfs.ext4 /dev/VolGroup02/data
mke2fs 1.41.12 (17-May-2010)
Filesystem label=
OS type: Linux
Block size=4096 (log=2)
Fragment size=4096 (log=2)
Stride=0 blocks, Stripe width=0 blocks
19005440 inodes, 76021760 blocks
3801088 blocks (5.00%) reserved for the super user
First data block=0
Maximum filesystem blocks=4294967296
2320 block groups
32768 blocks per group, 32768 fragments per group
8192 inodes per group
Superblock backups stored on blocks:
32768, 98304, 163840, 229376, 294912, 819200, 884736, 1605632, 2654208,
4096000, 7962624, 11239424, 20480000, 23887872, 71663616

Writing inode tables: done
Creating journal (32768 blocks): done
Writing superblocks and filesystem accounting information: done

This filesystem will be automatically checked every 23 mounts or
180 days, whichever comes first. Use tune2fs -c or -i to override.

[root@mdc2vr6009 /]# mount /opt/iwov_data

[root@mdc2vr6009 /]# df -h
Filesystem Size Used Avail Use% Mounted on
/dev/mapper/VolGroup01-LogVol10
4.0G 522M 3.3G 14% /
tmpfs 3.9G 0 3.9G 0% /dev/shm
/dev/sda1 248M 36M 200M 16% /boot
/dev/mapper/VolGroup01-LogVol14
6.0G 87M 5.6G 2% /home
/dev/mapper/VolGroup01-LogVol12
30G 14G 15G 48% /opt
/dev/mapper/VolGroup01-LogVol11
6.0G 1.8G 3.9G 31% /usr
/dev/mapper/VolGroup01-LogVol13
6.0G 392M 5.3G 7% /var
/dev/mapper/VolGroup01-LogVol15
30G 3.9G 25G 14% /www
tmpfs 8.0G 3.3M 8.0G 1% /tmp
none 30G 14G 15G 48% /iwmnt/default
none 30G 14G 15G 48% /iwmnt/iwadmin
/dev/mapper/VolGroup02-data
286G 191M 271G 1% /opt/iwov_data

[root@mdc2vr6009 /]# ls -l /opt/iwov_data
total 16
drwx------ 2 root root 16384 Mar 24 17:13 lost+found

[root@mdc2vr6009 /]# pvs
PV VG Fmt Attr PSize PFree
/dev/sda2 VolGroup01 lvm2 a-- 99.72g 5.72g
/dev/sdb VolGroup02 lvm2 a-- 300.00g 10.00g

[root@mdc2vr6009 /]# cd /opt/iwov_data
[root@mdc2vr6009 iwov_data]# touch pankaj
[root@mdc2vr6009 iwov_data]# ls -l
total 16
drwx------ 2 root root 16384 Mar 24 17:13 lost+found
-rw-r--r-- 1 root root 0 Mar 24 17:15 pankaj

[root@mdc2vr6009 iwov_data]# cat > deleteit
^C
[root@mdc2vr6009 iwov_data]# ls -l
total 16
-rw-r--r-- 1 root root 0 Mar 24 17:16 deleteit
drwx------ 2 root root 16384 Mar 24 17:13 lost+found
-rw-r--r-- 1 root root 0 Mar 24 17:15 pankaj


[root@mdc2vr6009 iwov_data]# blockdev --getbsz /dev/VolGroup02/data
4096

XFS: mkdir command gives: "mkdir: cannot create directory '###': No space left on device"

Issuing a mkdir command gives: "mkdir: cannot create directory '###': No space left on device"


umount /pgdata
mount -o inode64 /pgdata

edit /etc/fstab as below
/dev/vg_pgdata/lv_pgdata    /pgdata     xfs           inode64             1 0
By default in RHEL5 and RHEL6, xfs will only create inodes in disk blocks which result in inode numbers less than 2^32. If all of these low disk blocks are full, no more files can be created. Mounting with -o inode64 allows inodes to be created anywhere on disk. However, some 32-bit applications cannot handle 64-bit inode numbers.

RHEL7 will default to allowing 64-bit inode numbers.

Another possible cause is severely fragmented freespace. XFS allocates inodes in contiguous clusters of disk blocks; if no sufficiently large regions of freespace are available, no more inodes can be created.

Tuesday, October 21, 2014

Why directory size are different

It's the size necessary to store the meta-data about files (including the file names contained in that directory). The number of files / sub-directories at a given time might not map directly to the size reported, because once allocated, space is not freed if the number of files changes.
This behavior makes sense for most use cases (where disk space is cheap, and once a directory has a lot of files in it, it will probably have them again in future), and helps to reduce fragmentation.


[root@pgvmdc ~]# mkdir test1

[root@pgvmdc ~]# ls -ltr | grep test1
drwxr-xr-x 2 root root       4096 Oct 21 16:38 test1
default directory size
[root@pgvmdc ~]# cd test1

[root@pgvmdc test1]# pwd
/root/test1

[root@pgvmdc test1]# for i in {0..1000}; do echo "hello, this is a test only " > $i; done;
created 1000 files under test1
[root@pgvmdc test1]# ls -ltr ../ | grep test1
drwxr-xr-x 2 root root      20480 Oct 21 16:58 test1
change in the directory size

[root@pgvmdc test1]# rm -rf *

[root@pgvmdc test1]# ls -ltr ../ | grep test1
drwxr-xr-x 2 root root      20480 Oct 21 16:58 test1


Here you see that when even empty files are created, the directory size increases - the file names and meta data must be stored somewhere, and it is in the directory object itself. In this case the file names and other meta-data fit in 5 x 4k blocks (20480 = 4096 * 5).

Deleting the files does not reduce the space used by the directory object - only removing the directory and re-creating it frees the space.

Monday, March 31, 2014

IOPS

Any storage performance are ultimately calculated by how best the underlying disks are performing.

IOPS is still the most common metric in use to measure the storage systems performance


IOPS calculations vary wildly based on the kind of workload being handled.

In general, there are three performance categories related to IOPS:
random performance, sequential performance, and a combination of the two,

which is measured when you assess random and sequential performance at the same time

IOPS is based on three key factors:
Rotational/spindle speed (A higher rotational speed is associated with a higher performing disk.)

Average Latency (time it takes for the sector of the disk being accessed to rotate into position under a read/write head.)

Average seek time (time (in ms) it takes for the hard drive's read/write head to position itself over the track being read or written. There are both read and write seek times; take the average of the two values)

Average IOPS Formula:
Divide 1 by the sum of the average latency in ms and the average seek time in ms
(1 / (average latency in ms + average seek time in ms).

3ms   = average latency time
4.2ms = average seek time (read/write)

1/ 3ms + 4.2ms
1/7.2ms
1/.0072 = 138.88 = 139 IOPS


Average IOPS
SATA 7200K - 75-100
SATA 10K - 125-150
SAS 10K - 140
SAS 15K - 175-210
FC 15K - 200


Enterprises don't install a single disk at a time,
so the above calculations are pretty meaningless unless they can be translated to multidisk sets.
Fortunately, it's easy to translate raw IOPS values from single disk to multiple disk implementations;

For example, if you have ten 15K RPM disks, each with 175 IOPS capability, your disk system has 1,750 IOPS worth of performance capacity.
But this is only if you opted for a RAID-0 or just a bunch of disks (JBOD) implementation.

How to convert .crt/.cer into .pem

Generally your certificate comes in 2 formats:
X.509 and PKCS #7 which includes the Intermediate CA.

X509 File Extensions
The first thing we have to understand is what each type of file extension is.


[root@pg8873 2014_cert]# pwd
/home/pkg/2014_cert

[root@pg8873 2014_cert]# ls -l
total 44
-rwxr-xr-x 1 root root   26 Mar 11 16:13 passphrase-file
-rw-r--r-- 1 root root 2194 Mar 11 16:13 pgstars.2014.crt
-rw-r--r-- 1 root root 1110 Mar 11 16:14 pgstars.2014.csr
-rw-r--r-- 1 root root 1751 Mar 11 16:13 pgstars.2014.key
-rw-r--r-- 1 root root 6022 Mar 13 16:32 pgstars.p7b

Download the cert in both the formats,
PKCS #7 format   save as .p7b
X.509 format save as .crt


Convert P7B to PFX
————————————————————————————————————
$ openssl pkcs7 -print_certs -in certificate.p7b -out certificate.cer
$ openssl pkcs12 -export -in certificate.cer -inkey privateKey.key -out certificate.pfx -certfile CAcert.cer
————————————————————————————————————
Example:
[root@pg8873 2014_cert]# openssl pkcs7 -print_certs -in pgstars.p7b -out pgstars.2014.cer

[root@pg8873 2014_cert]# openssl pkcs12 -export -in pgstars.2014.cer -inkey pgstars.2014.key -out pgstars.2014.pfx -certfile pgstars.2014.crt
Enter pass phrase for stars.2014.key:
Enter Export Password:
Verifying - Enter Export Password:


PFX
Convert PFX to PEM
——————————————————————————————–
$ openssl pkcs12 -in certificate.pfx -out certificate.cer -nodes
——————————————————————————————–
NOTE: While converting PFX to PEM format, openssl will put all the Certificates and Private Key into a single file. You will need to open the file in Text editor and copy each Certificate & Private key(including the BEGIN/END statements) to its own individual text file and save them as certificate.cer, CAcert.cer, privateKey.key respectively.

Example:
[root@pg8873 2014_cert]# openssl pkcs12 -in stars.2014.pfx -out stars.2014.new2.pem -nodes
Enter Import Password:
MAC verified OK

Thursday, March 6, 2014

duplicate host ssh keys

cd /etc/ssh

# ls -l
total 164
-rw-------. 1 root root 125811 Apr  4  2011 moduli
-rw-r-r-. 1 root root   2047 Apr  4  2011 ssh_config
-rw-------  1 root root   3503 Jan 17 15:54 sshd_config
-rw-------  1 root root   3321 Dec  6  2012 sshd_config_03202013
-rw-------. 1 root root   3872 Jun 13  2012 sshd_config.orig
-rw-------. 1 root root    668 Jun 13  2012 ssh_host_dsa_key
-rw-r-r-. 1 root root    590 Jun 13  2012 ssh_host_dsa_key.pub
-rw-------. 1 root root    963 Jun 13  2012 ssh_host_key
-rw-r-r-. 1 root root    627 Jun 13  2012 ssh_host_key.pub
-rw-------. 1 root root   1671 Jun 13  2012 ssh_host_rsa_key
-rw-r-r-. 1 root root    382 Jun 13  2012 ssh_host_rsa_key.pub

mv ssh_host* /tmp

ssh-keygen -t rsa1 -f /etc/ssh/ssh_host_key
ssh-keygen -t rsa -f /etc/ssh/ssh_host_rsa_key
ssh-keygen -t dsa -f /etc/ssh/ssh_host_dsa_key

service sshd restart

It is best practice for security sake to have every server have a unique SSH host key. 

Just a reminder, that it will break any existing ssh keys job you may have setup for users.

Wednesday, March 5, 2014

OpenStack computing formula

OpenStack computing formula


(Over commit fraction x Physical cores) / VM cores per host

Example:
Physical cores = 8 (2 x Quad cores)
Over commit fraction = 1.6
Total VMs cores = 12.8 cores

If you want each VM with 2 virtual cores
(1.6 x 8) / 2 = 6.4 VMs

You can have 6.4 virtual machines, out of 8 physical cores


Monday, February 17, 2014

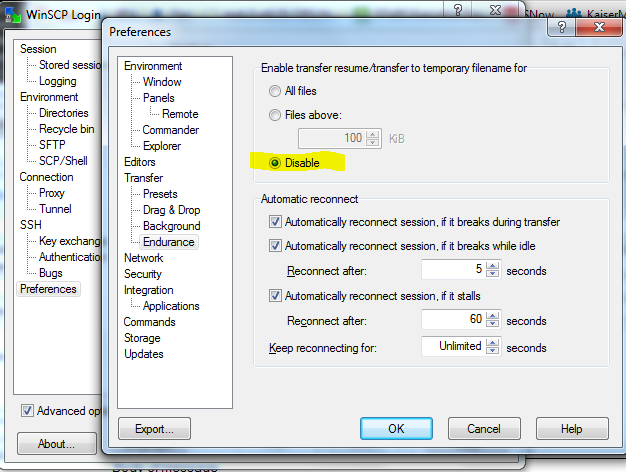
WinSCP creates temporary file with .filepart extension even after successfully transmitted

All the files gets uploaded successfully comes with .filepart extension when using Winscp.

After spending sometime on this, it seems WinSCP transfers the data with temporary filename first and then renames the file after successful transfer to able to resume from partial file if the transfer is interrupted. And while using stfp its doesn't allow to change the file name as part of the same operation.


You can get over this problem by disabling the resume/transfer option in WinSCP

not creating .Xauthority file


$HOME/.Xauthority is created on first login for X11 applications to work.

This is problem was noticed on
Red Hat Enterprise Linux Server release 6.4 (Santiago)


Edit /etc/ssh/sshd_config as below

#AddressFamily any 
AddressFamily inet

Restart sshd
# service sshd restart
Stopping sshd:                                           [  OK  ]
Starting sshd:                                             [  OK  ]

Result:
login as: pkg
Using keyboard-interactive authentication.
Password:
Last login: Wed Feb 12 17:31:43 2014 from l4612554.federated.fds
Kickstarted on 2014-02-06
/usr/bin/xauth:  creating new authority file /home/pkg/.Xauthority


I don't have much details on this but it seems like
Disabling IPv6 requires restricting the sshd address family to IPv4 by specifying value "inet".

Wednesday, January 22, 2014

Solaris ftp umask - /etc/ftpd/ftpaccess

How to setup umask for ftp users on Solaris.

Here is the official doc page to setup ftpaccess configuration from Oracle 
http://docs.oracle.com/cd/E23823_01/html/816-5174/ftpaccess-4.html#REFMAN4ftpaccess-4

defumask umask class
        Set the umask applied to files created by the FTP server if the remote user is a member of the named class. If class is         not specified, then use the umask as the default for classes that do not have one specified.
        The mode of files created may be specified by using the upload directive.


upload [absolute|relative] [class=classname]... [-]
root-dir dirglob yes|no owner group mode
[dirs|nodirs] [d_mode]
Define a directory with dirglob that permits or denies uploads. If it does permit uploads, all newly created files is owned by owner and group and has their permissions set according to mode. Existing files that are overwritten retains their original ownership and permissions. Directories are matched on a best-match basis. For example:
upload /var/ftp  *  no
upload /var/ftp /incoming yes ftp daemon 0666
upload /var/ftp /incoming/gifs yes jlc guest 0600 nodirs
would only allow uploads into /incoming and /incoming/gifs. Files that were uploaded to /incoming are owned by ftp/daemon and have permissions of 0666. Files uploaded to /incoming/gifs are owned by jlc/guest and have permissions of 0600. The optional dirs and nodirs keywords can be specified to allow or disallow the creation of new subdirectories using the mkdir command. If the upload command is used, directory creation is allowed by default. To turn it off by default, you must specify a user, group and mode followed by the nodirs keyword as the first line where the upload command is used in this file. If directories are permitted, the optionald_mode determines the permissions for a newly created directory. If d_mode is omitted, the permissions are inferred from mode. The permissions are 0777 if mode is also omitted. The upload keyword only applies to users who have a home directory of root-dirroot-dir may be specified as * to match any home directory. The owner or groupmay each be specified as *, in which case any uploaded files or directories are created with the ownership of the directory in which they are created. The optional first parameter selects whether root-dir names are interpreted as absolute or relative to the current chroot'd environment. The default is to interpret  names as absolute. You can specify any number of class=classname restrictions. If any are specified, this upload clause only takes effect if the current user is a member of one of the classes.
In the absence of any matching upload clause, real and guest users can upload files and make directories, but anonymous users cannot. The mode of uploaded files is 0666. For created directories, the mode is 0777. Both modes are modified by the current umask setting.

Which basically tells you - figure it out :-)

Our requirement is to upload files and directories as user1 with permission 777 so any normal user can remove the uploaded directories.

After spending hours with defumask and umask syntax, I figured out that the secret sauce is in the upload.

edit /etc/ftpd/ftpaccess as below

upload  /mft/user1 /mft/user1  yes user1 group1 0777 dirs 0777
upload  /mft/user1 /mft/user1/*  yes user1 group1 0777 dirs 0777
upload  /mft/user1 /mft/user1/*/*  yes user1 group1 0777 dirs 0777


if you  are uploading a structure like folder1/folder2/folder3 under /mft/user1

You would need all 3 lines to make all the folder1/folder2/folder3 files/directories under /mft/user1 with 777

:-( 
i know

Monday, January 13, 2014

Runtime linker error ld.so.1

Here is an error example:
bash-3.2# /usr/local/GraphicsMagick/bin/gm display
ld.so.1: gm: fatal: libfreetype.so.6: open failed: No such file or directory

What is this problem means: This is runtime linker error which tells us that this application/binary consists of more than one shared dynamic objects dependencies. ld.so is trying to link all the dependencies and not able to find few shared ojbects.

The environment variable LD_LIBRARY_PATH can be used to indicate directories to be searched before the default directories

Try ldd to print all the shared library dependencies for this binary.
bash-3.2# ldd /usr/local/GraphicsMagick/bin/gm
libtiff.so.3 => /usr/lib/libtiff.so.3
libfreetype.so.6 => (file not found)                                       <==(file not found error)
libjpeg.so.9 => (file not found)                                             <==(file not found error)
libpng12.so.0 => /usr/lib/libpng12.so.0
libXext.so.0 => /usr/lib/libXext.so.0
libSM.so.6 => /usr/lib/libSM.so.6
libICE.so.6 => /usr/lib/libICE.so.6
libX11.so.4 => /usr/lib/libX11.so.4
libsocket.so.1 => /lib/libsocket.so.1
libnsl.so.1 => /lib/libnsl.so.1
libbz2.so => /usr/local/lib/libbz2.so
libxml2.so.2 => /usr/lib/libxml2.so.2
libz.so => /usr/local/lib/libz.so
libm.so.2 => /lib/libm.so.2
libpthread.so.1 => /lib/libpthread.so.1
libc.so.1 => /lib/libc.so.1
libz.so.1 => /usr/local/lib/libz.so.1
libz.so.1 (SUNW_1.1) => (version not found)
libdl.so.1 => /lib/libdl.so.1
libmp.so.2 => /lib/libmp.so.2
libmd.so.1 => /lib/libmd.so.1
libscf.so.1 => /lib/libscf.so.1
libgcc_s.so.1 => /opt/artesia68/lib/libgcc_s.so.1
libz.so.1 (SUNW_1.1) => (version not found)
libdoor.so.1 => /lib/libdoor.so.1
libuutil.so.1 => /lib/libuutil.so.1
libgen.so.1 => /lib/libgen.so.1
/lib/libm/libm_hwcap1.so.2
/platform/sun4v/lib/libc_psr.so.1
/platform/sun4v/lib/libmd_psr.so.1

Check LD_LIBRARY_PATH
echo $LD_LIBRARY_PATH /opt/game/jboss/lib: /opt/game/java/lib: /opt/game/lib: /opt/game/lib/inso: /opt/game/java/jre/lib/sparc/client: /opt/game/java/jre/lib/sparc: /opt/game/ImageMagick-6.4.4/lib: /usr/sfw/lib/sparcv9

Find the missing library path
bash-3.2# ls -l /usr/sfw/lib/libfreetype.so.6
-rwxr-xr-x 1 root bin 882032 Jun 6 2012 /usr/sfw/lib/libfreetype.so.6

By default For 32-bit objects are /lib followed by /usr/lib.
For 64-bit objects, the defaults are /lib/64 followed by /usr/lib/64

Here in this example the 32-bit path for libfreetype.so.6 is not defined which should be /usr/sfw/lib/ instead of /usr/sfw/lib/sparcv9

Point/Link the required /usr/sfw/lib/libfreetype.so.6 under /usr/lib
bash-3.2# ln -s /usr/sfw/lib/libfreetype.so.6 /usr/lib/libfreetype.so.6

Point/Link
bash-3.2# ln -s /usr/local/lib/libjpeg.so.9.0.0 /usr/lib/libjpeg.so.9

Tuesday, January 7, 2014

X11 doesn't work with sudo su -

Here is the situation:

login as: pkg
Using keyboard-interactive authentication.
Password:
Last login: Tue Jan  7 22:02:07 2014 from l2554
Kickstarted on 2012-10-19
/usr/bin/xauth:  creating new authority file /home/pkg/.Xauthority

[pkg@mdc3 ~]$xterm - works
[pkg@mdc3 ~]$sudo su -

[root@mdc3 ]# xterm - doesn't work
PuTTY X11 proxy: wrong authorisation protocol attemptedWarning: This program is an suid-root program or is being run by the root user. The full text of the error or warning message cannot be safely formatted
in this environment. You may get a more descriptive message by running the
program as a non-root user or by removing the suid bit on the executable.
xterm Xt error: Can't open display: %s


Here is what you have to do
su - pkg -c "xauth list"  | xargs -n 3 xauth add


Basically we have to add the xauth created by user "pkg" to this new user "root"

[pkg@mdc3vr1138 ~]$ xauth list
mdc3vr1138/unix:10  MIT-MAGIC-COOKIE-1  d9241397a36b9ecc2cb03b07addf4008

[root@mdc3vr1138 ~]# xauth add mdc3vr1138/unix:10  MIT-MAGIC-COOKIE-1  d9241397a36b9ecc2cb03b07addf4008